Make a Free WordPress Contact Form plugin using ChatGPT – 100% free
How to Create a Custom WordPress Contact Form Plugin Using ChatGPT
Learn how to build an AI-powered contact form for your WordPress site with ChatGPT.
Are you tired of using generic contact forms on your WordPress website? Do you want to create a free WordPress Contact Form Plugin Using ChatGPT, that matches your website’s branding and meets your specific requirements? In this tutorial, we will show you how to create a custom WordPress contact form plugin using ChatGPT, an AI-powered language model developed by OpenAI and show you how to embed it on your WordPress site.
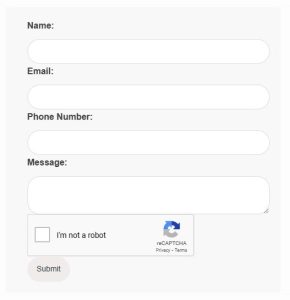
Here is the live demo of the Worpress contact form that has been built using ChatGPT:
You can watch the youtube video of the process of using ChatGPT for creating wordpress plugins :
What is ChatGPT?
ChatGPT is an AI language model that can understand natural language and generate text based on its training data. It can be used for various natural language processing (NLP) tasks, such as language translation, text summarization, and conversation generation. In this tutorial, we will use ChatGPT to generate the code for our custom contact form plugin, based on our natural language input.
Step 1: Create a ChatGPT account
Before we start making a WordPress Contact Form Plugin Using ChatGPT , you need to create a ChatGPT account by visiting the website chat.openai.com. Once you’ve signed up, you can access the model and start using it for your NLP tasks.
Step 2: Generate the code for your custom contact form plugin
To generate the code for your custom contact form plugin, you need to provide ChatGPT with some natural language instructions. For example, you could say “I want to create a contact form with three fields: Name, Email, and Message. I want the form to be sent to my email address when submitted, and I want to add reCAPTCHA for security.”
Based on your input, ChatGPT will generate the code for your custom contact form plugin. You can then copy and paste the code into your WordPress website’s plugin editor, or save it as a file and upload it to your website.
Step 3: Integrate the custom contact form plugin with WordPress
To integrate the custom free WordPress Contact Form Plugin Using ChatGPT to your website, you need to activate it in the Plugins section of your WordPress dashboard. Once activated, you can add the contact form to your website by using a shortcode or adding it to a page or post using the Gutenberg editor.
Step 4: Customize the contact form
 To make the contact form match your website’s branding, you can customize its appearance and behavior. For example, you can change the font, color, and layout of the form fields, add custom CSS styles, and configure the form submission behavior. You can also add form validation to ensure that the user inputs valid data, and add reCAPTCHA to prevent spam and bot submissions.
Conclusion
In this tutorial, we showed you how to create a custom WordPress contact form plugin using ChatGPT, an AI-powered language model. By generating the code for the contact form based on natural language input, ChatGPT can save you time and effort in programming the form from scratch. With the custom contact form plugin integrated with your WordPress website, you can provide a user-friendly and secure way for your website visitors to contact you. We hope this tutorial has been helpful, and we encourage you to experiment with ChatGPT for your other NLP tasks as well.
Here are the code that was generated by ChatGPT , you can customize it to fit your need :
<?php
/**
* Plugin Name: CGPT-Contact-Form
* Description: A simple contact form plugin for WordPress written with ChatGPT.
* Version: 1.0 | Shorcode: ''
* Author: CASTLE & Chat GPT
* Author URI: https://castle.com.bd/
**/
// Add the shortcode to display the contact form.
add_shortcode( 'my_contact_form', 'my_contact_form_shortcode' );
// Define the my_contact_form_shortcode() function.
function my_contact_form_shortcode() {
// Check if the form was submitted.
if ( isset( $_POST['my_contact_form_submit'] ) ) {
// Verify the captcha.
$secret_key = 'your_secret_key'; // Replace with your own secret key.
$response = $_POST['g-recaptcha-response'];
$verify_url = 'https://www.google.com/recaptcha/api/siteverify';
$verify = wp_remote_post( $verify_url, array(
'body' => array(
'secret' => $secret_key,
'response' => $response
)
) );
$verify = json_decode( $verify['body'] );
if ( $verify->success ) {
// Sanitize the user input.
$name = sanitize_text_field( $_POST['my_contact_form_name'] );
$email = sanitize_email( $_POST['my_contact_form_email'] );
$phone_number = sanitize_text_field( $_POST['my_contact_form_phone_number'] );
$message = sanitize_textarea_field( $_POST['my_contact_form_message'] );
// Send the email.
$to = get_option( 'admin_email' );
$subject = 'New contact form submission';
$body = "Name: $name\nEmail: $email\nPhone Number: $phone_number\nMessage:\n$message";
$headers = array( 'Content-Type: text/html; charset=UTF-8' );
wp_mail( $to, $subject, $body, $headers );
// Redirect to the thank you page.
wp_redirect( 'https://castle.com.bd/thank-you/' );
exit;
} else {
// Display an error message if the captcha is invalid.
$output = '<div class="my-contact-form-error">';
$output .= '<p>The captcha is invalid. Please try again.</p>';
$output .= '</div>';
}
} else {
// Display the contact form.
$output = '<div class="my-contact-form">';
$output .= '<form method="post">';
$output .= '<label for="my_contact_form_name">Name:</label>';
$output .= '<input type="text" name="my_contact_form_name" required>';
$output .= '<label for="my_contact_form_email">Email:</label>';
$output .= '<input type="email" name="my_contact_form_email" required>';
$output .= '<label for="my_contact_form_phone_number">Phone Number:</label>';
$output .= '<input type="text" name="my_contact_form_phone_number" required>';
$output .= '<label for="my_contact_form_message">Message:</label>';
$output .= '<textarea name="my_contact_form_message" required></textarea>';
$output .= '<div class="g-recaptcha" data-sitekey="your_site_key"></div>'; // Replace with your own site key.
$output .= '<input type="submit" name="my_contact_form_submit" value="Submit">';
$output .= '</form>';
$output .= '</div>';
}
return $output;
}
// Add the CSS styles for the contact form.
add_action( 'wp_enqueue_scripts', 'my_contact_form_styles' );
// Define the my_contact_form_styles() function.
function my_contact_form_styles() {
wp_enqueue_style( 'my-contact-form-styles', plugins_url( 'css/my-contact-form.css', __FILE__ ) );
}
// Add the JavaScript for the Google reCAPTCHA.
add_action( 'wp_enqueue_scripts', 'my_contact_form_scripts' );
// Define the my_contact_form_scripts() function.
function my_contact_form_scripts() {
wp_enqueue_script( 'google-recaptcha', 'https://www.google.com/recaptcha/api.js' );
}
Repalce “CASTLE.COM.BD” and “no-id@castle.com.bd” Edit and Paste the following code to theme function.php file to change the WordPress default sender name with your name :
// Change the WORDPRESS default email sender address.
add_filter( 'wp_mail_from', function ( $original_email_address ) {
return 'no-id@castle.com.bd';
} );

// Change the From name.
add_filter( 'wp_mail_from_name', function ( $original_email_from ) {
return 'CASTLE.COM.BD';
} );
- Thank you .
- Key words:
- Free WordPress Contact Form plugin
- Best Free WordPress Contact Form plugin
- WordPress Contact Form plugin
- Free Contact Form plugin for WordPress
- Contact Form plugin for WordPress
- Best Contact Form plugin for WordPress
- Free WordPress Form plugin
- WordPress Form plugin for free
- Best Free Form plugin for WordPress
- WordPress Form builder plugin for free

